Introduction
Deploying your own monitoring service is a rewarding step, but understanding the underlying mechanics is what transforms a simple gadget into a reliable infrastructure.
On my Raspberry Pi 4 (Ubuntu, 4 GB RAM), I installed Uptime Kuma (Node.js app) and Nginx Proxy Manager via Docker, exposing my blog (jamyvetter.net) with HTTPS.
In this article we’ll dissect the setup: how Docker’s virtual networks (docker0, veth, custom bridges) route traffic, how services persist after reboot and how we obtained a wildcard Let’s Encrypt certificate for an A+ SSL configuration.
1. Network Architecture: From WLAN to Virtual Interfaces
By default, Docker creates a virtual bridge on the host. This acts like a software switch: each container gets a pair of virtual Ethernet interfaces (a veth pair), with one end inside the container (eth0) and the other end on the host plugged into the docker0 bridge.
The figure below illustrates this concept: containers connect via their veth ends to the host’s virtual switch (docker0), enabling inter-container communication and NAT to the outside world.
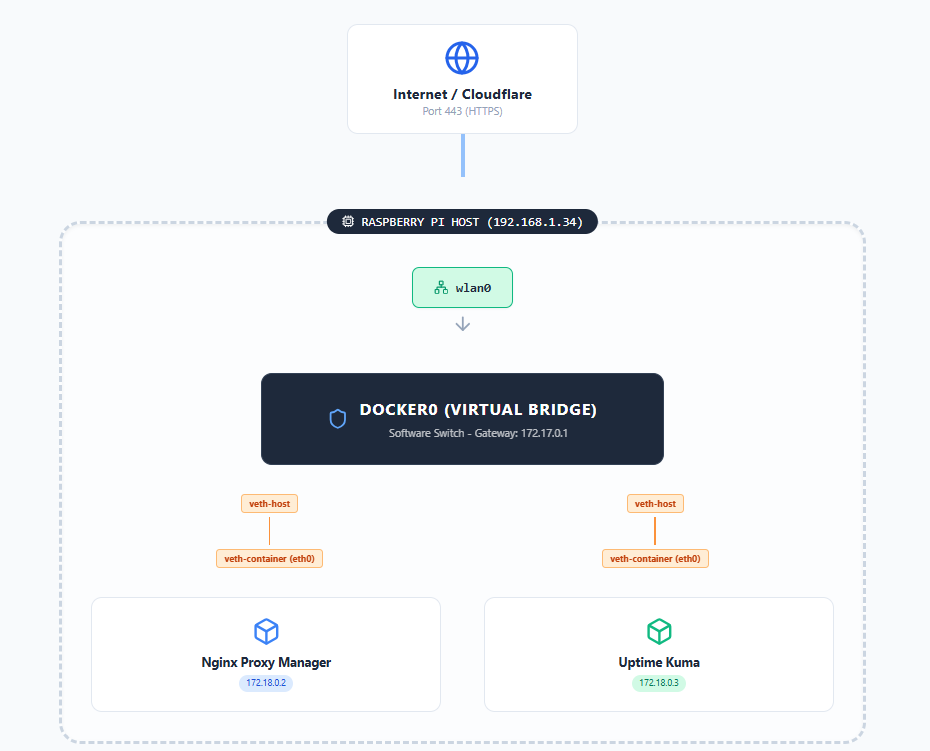
In practice, the docker0 bridge routes all container traffic. For example, on my Pi ip addr shows both docker0 and a custom bridge (br-... for my web-network), plus wlan0 on the LAN:
|
|
Here, docker0 (172.17.0.1) is Docker’s default bridge. The br-1d79a610db3d interface (172.18.0.1) is a user-defined bridge (web-network). Each container has two veth interfaces: one attached to docker0 (master docker0) and one to br-1d79a610... (master br-...). These veth pairs are why we saw two veth interfaces per container. For instance, one veth end lives in a container’s namespace (e.g. eth0), while the other end (vethXXXX@if*) lives on the host attached to the corresponding bridge.
By isolating networks this way, containers on web-network (Nginx Proxy Manager and Uptime Kuma) can communicate privately, while still allowing external access via published ports on the host. Docker’s networking docs note that container ports on a bridge are accessible from the host. In our setup, we published ports 80, 443,etc, mapping them from the host to the Nginx Proxy Manager container. Indeed, systemctl status docker command shows docker-proxy processes binding host port 443 (0.0.0.0:443) to the container IP 172.17.0.3:443. In short, the host kernel listens on port 443 and forwards traffic to the Nginx container, which actually handles the HTTPS service.
|
|
2. System Persistence and Resilience
A robust monitoring setup must recover automatically after reboots or crashes. On my Pi, systemd manages the Docker daemon (dockerd), ensuring the Docker service starts at boot (Enabled: yes in systemctl). Checking systemctl status docker confirms Docker has been running since boot (e.g. “active (running) since … 8 days ago”). This means when the Pi reboots, Docker will launch without intervention.
To ensure each container itself restarts, I set Docker’s restart policy. Using restart: always command in Docker Compose (or docker run --restart=always), Docker will always restart the container if it stops, or when the daemon restarts. For example:
|
|
This confirms the uptime-kuma container is configured to always restart. Thanks to this, after a reboot the Uptime Kuma and Nginx Proxy Manager containers automatically come back up without manual steps. (Docker’s documentation explicitly notes that --restart always will restart the container on crashes or daemon restart.)
In normal operation, these containers use very little of the Pi’s resources. A quick check with docker stats --no-stream shows only ~210 MB RAM used (around 2–3% per container) and negligible CPU:
|
|
With just ~210 MiB total RAM in use, over 90% of the Pi’s memory is still free. In practice, simply running
docker stats(or GUI tools like Portainer) is enough to monitor resource usage. If needed, one could set resource limits in Docker or monitor the Pi with tools likehtop, but for this setup no issues were observed.
3. SSL/TLS and Certificate Management
TLS Termination and HTTP/2
All HTTPS (TLS) handling is done by the Nginx Proxy Manager container. Inside Docker, Nginx Proxy Manager runs Nginx as a reverse proxy: it listens on ports 80 and 443 and forwards requests to Uptime Kuma (on the Docker network) over plain HTTP. Uptime Kuma itself has no certificate configured and simply serves HTTP on port 3001 internally. By decoupling TLS, NPM can use optimized C code and dedicated hardware acceleration, while Uptime Kuma’s Node.js server remains lighter.
The NPM configuration confirms this setup. Its generated proxy host config for up.jamyvetter.net includes:
|
|
Key points from this config:
- Port Listening: NPM listens on host ports 80 and 443 and does the TLS handshake (
listen 443 ssl). The host’s kernel actually has port 443 open, forwarding to this container (as seen in the Docker-proxy processes). - HTTP/2 Enabled:
http2 on; multiplexes requests over TLS for better performance and reduced latency. - TLS Certificate: The paths
/etc/letsencrypt/live/npm-1/fullchain.pemshow where the Let’s Encrypt cert is stored inside the NPM container. - HSTS Header: The
add_header Strict-Transport-Security "max-age=63072000; preload" always;line enforces HTTPS-only access for 2 years and opts into browser preload lists. - Redirect to HTTPS: The included
force-ssl.confmakes sure HTTP traffic on port 80 is redirected to HTTPS.
Importantly, no Apache or Nginx is running on the host itself, all web serving comes from the Docker containers. A search on the Pi for other web servers (e.g. ps aux | grep nginx) shows only the NPM container’s Nginx. The Pi’s operating system merely runs Docker; all TLS termination is handled inside the NPM container. Uptime Kuma is oblivious to HTTPS, serving only HTTP internally.
Security Headers and Cipher Suites
Achieving an A+ on SSL Labs requires strict HTTPS settings. Our configuration checks several boxes:
- Strict HSTS with preload (
max-age=63072000) is set, so all browsers that have seen the site will enforce HTTPS for 2 years. - Strong Cipher Suites & TLS Versions: Nginx Proxy Manager’s default profile enables modern ciphers (ECDHE with AES-GCM or ChaCha20 and SHA-256/384) and allows TLS 1.2 and 1.3 only. (Older protocols like TLS 1.0/1.1 are disabled by default.) This maximizes compatibility with current clients while avoiding weak crypto.
- HTTP→HTTPS Redirect: As noted, all HTTP requests are forced to HTTPS. This ensures no insecure fallback.
- OCSP Stapling and other tweaks: NPM’s config includes recommended SSL cache settings and exploits mitigations (e.g.
ssl-cache.conf,block-exploits.conf), which further boost the security grade.
These settings (HSTS, HTTP/2, TLS policies) live in the NPM container’s Nginx configuration. Uptime Kuma itself does not manage TLS at all, so it doesn’t need to worry about certificates or ciphers. The proxy “gatekeeper” takes on the full cryptographic load, freeing the application to just focus on monitoring logic.
Let’s Encrypt: DNS-01 Challenge and Wildcard Certificate
For certificate issuance, I used Nginx Proxy Manager’s built-in Let’s Encrypt support with a DNS-01 challenge (via Cloudflare). Here’s how it works in sequence:
- Request: NPM’s ACME client creates a certificate order for
*.jamyvetter.net(wildcard). - DNS-01 Challenge: Let’s Encrypt asks for proof of domain control by requiring a TXT DNS record. NPM (using Cloudflare API credentials) automatically creates a special
_acme-challenge.jamyvetter.netTXT record. - Validation: The CA (Let’s Encrypt) queries Cloudflare’s DNS for that TXT record. Finding the correct token confirms ownership. Because we used DNS-01, we can obtain a wildcard certificate (
*.jamyvetter.net), which coversup.jamyvetter.netand any other subdomain. - Certificate Issuance: Let’s Encrypt issues the wildcard certificate. NPM stores it under
/etc/letsencrypt/live/npm-1/. Renewal: NPM schedules automatic renewals (typically via a daily cron inside the container). The same DNS-01 process repeats before the 90-day expiration.
Using DNS-01 (instead of HTTP-01) was crucial for the wildcard. HTTP-01 would not allow *. certificates, and it requires opening port 80 to Let’s Encrypt. DNS-01 avoids exposing port 80 externally, fitting our security preference.
Certificate Verification
We can verify the certificate chain and expiration with common tools. For example:
- Chain and Expiration:
openssl s_client -connect exemple.com:443 -servername exemple.com </dev/null 2>/dev/null \ | openssl x509 -noout -dates -issuer -subjectshows valide dates of the certificate, issuer, name of the intermediate certificate used and other informations.
|
|
- SSL Labs Test: Visiting SSL Labs confirms the A+ grade and shows details like supported protocols and ciphers.
- Certificate Storage: Inside the NPM container, the certificate and key are in
/etc/letsencrypt/live/npm-1/. In our setup, this directory is mounted on a Docker volume (under NPM’s data folder), so the certificates persist even if the container is recreated. Thelsoutput confirms it:
|
|
The presence of the npm-1 folder indicates the live cert.
One can also use
docker exec nginx-proxy-manager certbot certificatesto list expiry dates, and rundocker exec nginx-proxy-manager certbot renew --dry-runto test renewal. In practice, the system hasn’t required manual intervention, NPM handles renewals automatically.
Conclusion and Best Practices
This deep dive shows that even a simple Raspberry Pi monitoring setup involves many layers of configuration. Key takeaways and best practices include:
- Network Isolation: Use Docker’s user-defined networks to isolate traffic. Our
web-networkmeans Uptime Kuma and NPM talk only to each other, not to any other container or service on the Pi. The defaultdocker0bridge provides external access, but internals remain private. - Port Mapping: Remember that published ports on a bridge network are reachable from the host. In our case, the Pi’s port 443 is forwarded to the NPM container. This keeps the container as the endpoint for HTTPS.
- Systemd + Restart Policies: Ensure the Docker service is enabled on boot. Use
--restart=always(orunless-stopped) for containers so they relaunch after reboot. Verify withdocker inspectorsystemctl status docker. - Resource Monitoring: Use
docker statsto check CPU and memory usage. In our test, both containers stayed under 5% RAM, showing the Pi has ample headroom. Monitoring helps size or constrain containers before they cause problems. - TLS Configuration: Delegate TLS termination to a dedicated reverse proxy. Here, Nginx Proxy Manager handled HTTPS and produced an A+ rating by enforcing HSTS, HTTP/2, and strong TLS settings. Uptime Kuma itself ran plain HTTP internally, which simplified its setup.
- Let’s Encrypt with DNS-01: For wildcard domains and closed port 80, DNS-01 via a DNS provider (Cloudflare API) is the way to go. It proves domain control via DNS TXT records. Always automate renewal and periodically test it (e.g.
certbot renew --dry-runor checking logs).
By understanding Docker’s network (bridges and veth pairs), properly configuring systemd and restart policies, and securing the web layer (TLS, HSTS, strong ciphers), we turn a personal Raspberry Pi into a resilient, secure monitoring host, one worthy of an A+ SSL rating.
Thanks for reading! My next article will probably be about automating my backups, because now that everything is online, I don’t want to lose everything on a faulty SD card!
Written with passion (and a few command lines) on my Raspberry Pi.